
Remote Access
AgentsView runs locally by default, binding to 127.0.0.1 so only
your machine can reach it. Remote access lets you open the UI from
other devices — a phone, tablet, or another computer on your
network — while keeping the server and data on your machine.
Quick Setup
Enable remote access in config.toml:
remote_access = trueThen start the server:
agentsviewWhen remote_access is true and no explicit -host is given,
the server automatically binds to 0.0.0.0. A 256-bit bearer
token is generated and printed to the console on first start:
Remote access enabled. Auth token: <token>Open http://<your-ip>:8080 from another device and pass the
token in the Authorization header or configure it in the
Settings page.
You can also enable remote access from the Settings page in
the web UI without editing config.toml directly.
Authentication
Remote access uses bearer token authentication. When
remote_access is enabled, a cryptographically random token
is auto-generated and stored in config.toml. All API
requests must include it:
Authorization: Bearer <token>The token is generated automatically on first enable — you don’t need to create one manually. It’s printed to the console on startup and visible in the Settings page (localhost only).
Localhost requests (127.0.0.0/8, ::1) bypass authentication
when remote_access is false (the default).
SSE Watch Endpoint
The Server-Sent Events endpoint (/watch) accepts the token
as a query parameter since the EventSource API cannot set
custom headers:
http://<host>:8080/watch?token=<token>Public URL and Trusted Origins
When running behind a reverse proxy or accessing via a hostname, tell AgentsView about the public URL so host and origin validation work correctly:
agentsview -public-url https://agents.example.comFor additional trusted origins (e.g. multiple domains or a
development proxy), use -public-origin:
agentsview \ -public-origin https://agents.example.com \ -public-origin https://internal.example.comFlags can also be comma-separated:
agentsview -public-origin https://a.example.com,https://b.example.comThese can be set in config.toml:
public_url = "https://agents.example.com"public_origins = [ "https://agents.example.com", "https://internal.example.com",]The server derives trusted Host and Origin values from
these inputs rather than weakening protections globally.
Managed Caddy Mode
For TLS-terminated access, AgentsView can manage a Caddy reverse proxy as a subprocess. The backend stays on loopback while Caddy handles the public-facing socket.
agentsview \ -public-url https://agents.example.com \ -proxy caddy \ -tls-cert /path/to/cert.pem \ -tls-key /path/to/key.pem| Flag | Default | Description |
|---|---|---|
-proxy | Proxy mode — currently caddy | |
-caddy-bin | caddy | Path to the Caddy binary |
-proxy-bind-host | 127.0.0.1 | Interface for Caddy to bind |
-public-port | 8443 | External port for the public URL |
-tls-cert | TLS certificate file path | |
-tls-key | TLS key file path | |
-allowed-subnet | Client CIDR allowlist (repeatable or comma-separated) |
Caddy must be installed and available on PATH (or specify
the path with -caddy-bin). AgentsView generates the
Caddyfile automatically — no manual Caddy configuration is needed.
How It Works
- AgentsView starts the HTTP server on loopback (
-host/-port) - A Caddyfile is generated under
~/.agentsview/managed-caddy/ - Caddy validates the config, then starts as a managed subprocess
- Caddy binds to
-proxy-bind-hoston-public-portand reverse-proxies to the loopback backend - When AgentsView shuts down, Caddy is stopped automatically
Subnet Allowlists
When using a non-loopback bind host for Caddy, restrict access to specific networks:
agentsview \ -proxy caddy \ -proxy-bind-host 0.0.0.0 \ -allowed-subnet 192.168.1.0/24 \ -allowed-subnet 10.0.0.0/8Requests from outside the allowed subnets receive a 403 response. At least one subnet must be specified when binding Caddy to a non-loopback interface.
Shorthand notation is normalized: 10.0/16 becomes
10.0.0.0/16.
Settings Page
Remote access can be configured from the Settings page in the web UI. The Remote Access section lets you:
- Toggle Allow remote connections on or off
- View the auto-generated auth token (with copy button)
- Connect the frontend to a remote AgentsView server by entering its URL and auth token
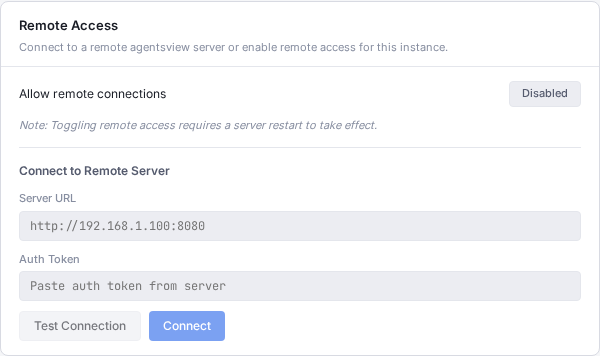
Changes that require a server restart (like toggling remote access) are noted in the UI.
CLI Flags Reference
| Flag | Default | Description |
|---|---|---|
-public-url | Public URL for hostname or proxy access | |
-public-origin | Trusted browser origin (repeatable/comma-separated) | |
-proxy | Managed proxy mode (caddy) | |
-caddy-bin | caddy | Caddy binary path |
-proxy-bind-host | 127.0.0.1 | Interface for managed proxy |
-public-port | 8443 | External port for managed proxy |
-tls-cert | TLS certificate path | |
-tls-key | TLS key path | |
-allowed-subnet | Client CIDR allowlist (repeatable/comma-separated) |
Config File Reference
Remote access fields in ~/.agentsview/config.toml:
remote_access = trueauth_token = "auto-generated-base64-token"public_url = "https://agents.example.com"public_origins = ["https://agents.example.com"]
[proxy]mode = "caddy"bin = "caddy"bind_host = "127.0.0.1"public_port = 8443tls_cert = "/path/to/cert.pem"tls_key = "/path/to/key.pem"allowed_subnets = ["192.168.1.0/24"]| Field | Description |
|---|---|
remote_access | Enable remote connections (auto-binds to 0.0.0.0) |
auth_token | Auto-generated 256-bit bearer token |
public_url | Public URL for host/origin validation |
public_origins | Additional trusted CORS origins |
proxy.mode | Managed proxy mode (caddy) |
proxy.bin | Path to proxy binary |
proxy.bind_host | Interface for proxy to bind |
proxy.public_port | External port for proxy |
proxy.tls_cert | TLS certificate path |
proxy.tls_key | TLS key path |
proxy.allowed_subnets | CIDR allowlist for proxy connections |
The config file is written with 0600 permissions (owner
read/write only).